

Whenever we wants to authenticate any user through phone number then the most basic way to do this is to send one OTP verification code, let user read it and then enters it into the website and then proceed. Now this process takes a bit of time and as a developer we can optimize it by using TrueSDK. It helps to authenticate user without any OTP verification, you just need to enter the mobile number and submit it, then you will get one push notification in your mobile where you just need to click and allow it and then you will be authenticated automatically. Since Truecaller have 250 million users then absolutely it is worth using it in this case. Here is the image showing the procedure:

Github link: https://github.com/shashank-sharma/python-truecaller-sdk Note: Entering phone number and authentication will save your name and phone number, so if you are concerned about your privacy then I suggest you avoid typing it and test it in your own project.
Because currently the documentation is not that helpful and I have seen many people struggling to figure out how to work with this. That’s why I wrote this blog to explain the flow of data and how we can make use of TrueSDK and in this case with Django framework.
Our first step is to signup with Truecaller and create one app so that we can get app token. So head over to this link and register yourself. After creating your account you will be redirected to dashboard. Now let’s create one app by clicking on Create App button. After creating the app select “Web” radio button because later we are going to use Django, so enter your app name, app domain and then callback url.
Note: It is important to have one domain to make sure that your TrueSDK is working fine. For this we will be using Heroku free app and generate one app domain over there. So let’s head to Heroku website and create one app. Open up your dashboard and click on New button and select Create new App. Now enter your app name and you will be good to go. In my case I’ll be using django-login.
Now we have our app domain so let’s enter the details as follows:
App Domain: https://django-login.herokuapp.com/ Callback URL: https://django-login.herokuapp.com/auth/true-sdk
Now submit these details and you will get your app key which we will be using it later.
For this blog I’ll be using Ubuntu GNOME OS.
Let’s create one project folder with any name. For this I’ll be using django-login folder name. Right now we will be creating our project from scratch so that you can understand how we are going to use it. So Let’s create one virtual environment by using:
python3.5 -m venv myvenv
Here myvenv will be by virtualenv folder. Now type:
source myvenv/bin/activate
Now our virtualenv is activated. Now let’s install all the dependencies which we need for our project.
 pip install Django==2.0.2
 pip install requests==2.9.1
 pip install gunicorn==19.7.1
 pip install whitenoise==3.3.0
After installing all these dependencies let’s initialize our Django project and create basic structure of it.
django-admin startproject truelogin .
Note: There is single dot at the end of command so that our project is created in the current directory.
To test let’s run:
python manage.py runserver
and it should work fine. Now let’s migrate all unapplied migrations and then we will use TrueSDK, for that execute:
python manage.py migrate

For using TrueSDK our first step is to get phone number from user and make one POST request to the given URL:
https://api4.truecaller.com/v1/apps/requests
With header parameter appKey of type string and body parameter with phoneNumber.
Note that header paramter and body parameter are different and to make use of this we will be using requests module in python to make one POST request. So our basic code will be:
import requests
import json
url = 'https://api4.truecaller.com/v1/apps/requests'
headers = {'content-type': 'application/json', 'appKey': 'APP_KEY'}
data = {'phoneNumber': 'PHONE_NUMBER'}
r = requests.post(url, headers=headers, data=json.dumps(data))
If you run this in your Python interpreter (in my case it is Ipython) then you should get 200 status code with requestId as your body text.
Note: You should use E.164 phone number format. For example if I am from India then I’ll be writing my phone number as: 91xxxxxxxxxx
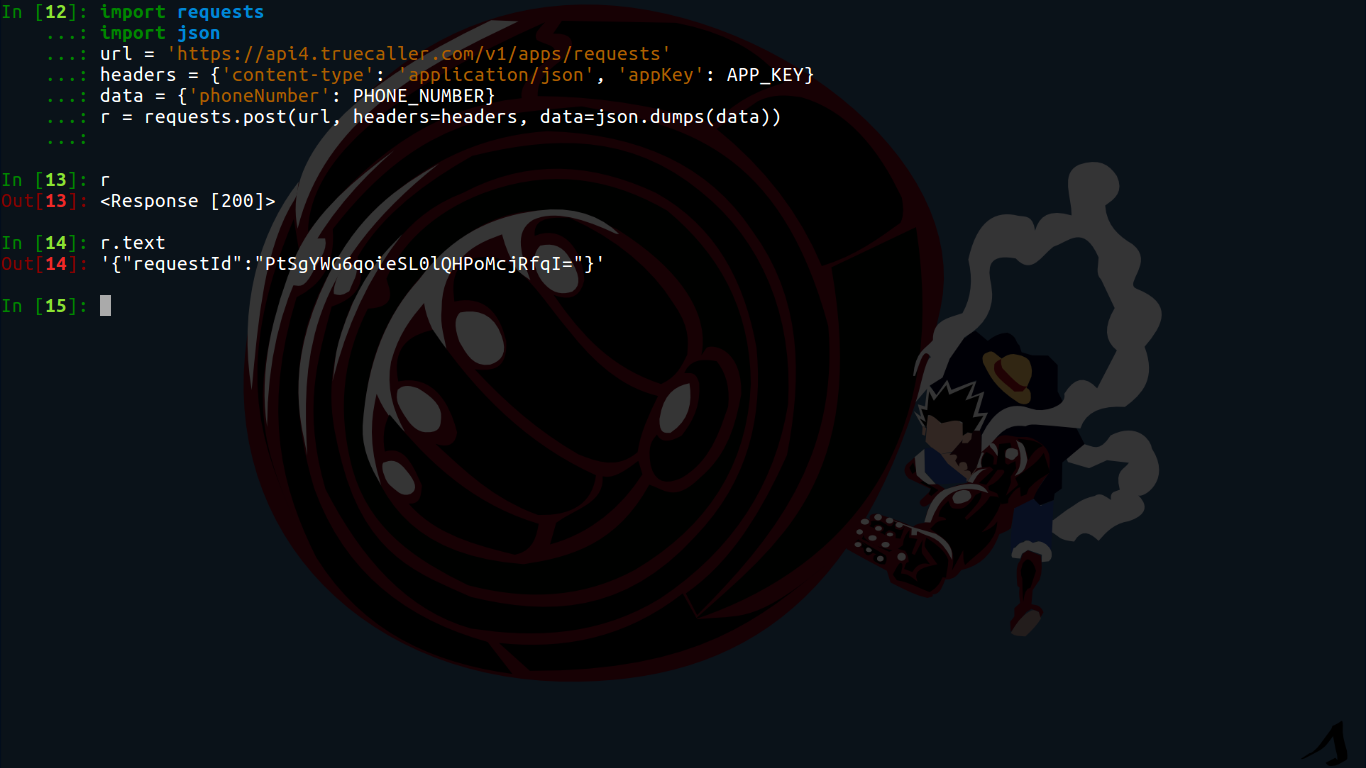
Here 200 request status means that your request has been accepted and the phone holder will be asked to authorize it. This requestId which is returned is later checked with accessToken which we will get.
Now our second step is to set our callback url. Before that you need to userstand that once the request has been accepted from POST request which we used earlier, truecaller will post access token to your callback endpoint which is /auth/true-sdk. So now we will set our callback URL and deploy it in our Heroku app so that it will be live and we can see the changes and at the same time. When we will be able to get accessToken then we can easily fetch user data by doing:
Right now we will set our homepage to accept phone number from input field and show result based on that, then later we will create all the functions.
Let’s create one new app which is login by:
python manage.py startapp login
Our first step is to create one home page which will accept one input field and then one button to submit. First let’s edit urls.py of main app folder:
from django.contrib import admin
from django.urls import path
from .views import home
from login.views import ajaxpost, truecaller

urlpatterns = [
    path('admin/', admin.site.urls),
    path('auth/true-sdk', truecaller),
    path('ajaxpost', ajaxpost),
    path('', home)
]
Here auth/true-sdk is used for callback, where we will be receiving the request from truecaller so that we can get accessToken and ajaxpost is user for doing the first step, which is requesting for request id from server so that we can receive access token back to callback url. On that same directory where settings.py is we will create views.py for home page as:
from django.shortcuts import render

def home(request):
 return render(request, 'home.html')
Now we will create our models for Truecaller because we will be getting requestId and accessToken, so we need to maintain it in our database. Our models.py for login app will look like:
from django.db import models

class Truecaller(models.Model):
    name = models.CharField(max_length=80)
    phone_number = models.CharField(max_length=15)
    access_token = models.CharField(max_length=80)
    requestId = models.CharField(max_length=80)
I have kept it quite simple here but in production level code you might need to set phone_number set to unique so that there is no duplicate likewise other things can also be optimized like regular expression for phone number etc.
After creating models we will create our second views.py which will be of login app where we will define all our requests, so let’s edit that. Our first priority is to get the requestId by posting the phone number from user. Since it will be an Ajax call so we will create one AJAX post request at back and in django we will define it.
def ajaxpost(request):
    # Getting phone number from AJAX post request
    phone_number = request.POST['phone_number']

    url = 'https://api4.truecaller.com/v1/apps/requests'
    headers = {'content-type': 'application/json', 'appKey': 'APP_KEY'}
    data = {'phoneNumber': phone_number}
    r = requests.post(url, headers=headers, data=json.dumps(data))
    json_data = json.loads(r.text)
    truecaller_model = Truecaller()
    truecaller_model.requestId = json_data['requestId']
    truecaller_model.phone_number = phone_number
    truecaller_model.save()              # To save all details
    return JsonResponse({
        'status_code': r.status_code,
        'text': r.text,
        'requestId': json_data['requestId']})
Now if we will try to make one ajax call and execute this function then it will successfully fetch requestId and save it in our database. Now our second step is to create function for callback as defined in urls.py For simplicity the truecaller function (which I defined in urls.py) will work on 2 scenarios:
The POST method will be used by TrueSDK when user will authenticate himself from his smartphone. As soon as he will authenticate it, there will be one POST request at /auth/true-sdk url. So now our views.py will also have this:
@csrf_exempt
def truecaller(request):
    if request.method == 'POST':
        try:
            json_data = json.loads(request.body.decode(encoding='UTF-8'))
            truecaller_model = Truecaller.objects.filter(requestId=json_data['requestId']).get()
            truecaller_model.access_token = json_data['accessToken']
            truecaller_model.save()
            return JsonResponse({'message': 'Success'})
        except:
            return JsonResponse({'message': 'Invalid request', 'status': 'FAILED'})
    else:
        try:
            requestId = urllib.parse.unquote(request.GET['requestId'])
            truecaller_model = Truecaller.objects.filter(requestId=requestId).get()
            if truecaller_model.access_token:
                return JsonResponse({'message': 'Success', 'status': 'OK', 'name': get_name(truecaller_model.access_token)})
            else:
                return JsonResponse({'message': 'Failed', 'status': 'NO'})
        except:
            return JsonResponse({'message': 'Invalid request', 'status': 'FAILED'})
In POST request we are using csrf_exempt because when TrueSDK will make POST request then it will not have any csrf token, so to avoid any error we used that. Second we loaded the JSON data from the request body and saved meaningful data from there.
In GET request we used urllib.parse.unquote function because when the requestId parameter is passed from URL then few special characters gets changed with url escaped characters. So to decode it we used that function. Example “=” will become “%3D” etc. The main concept for GET request is that if access_token is available for that particular request then we need to fetch the name from it, so we used get_name function to extract it.
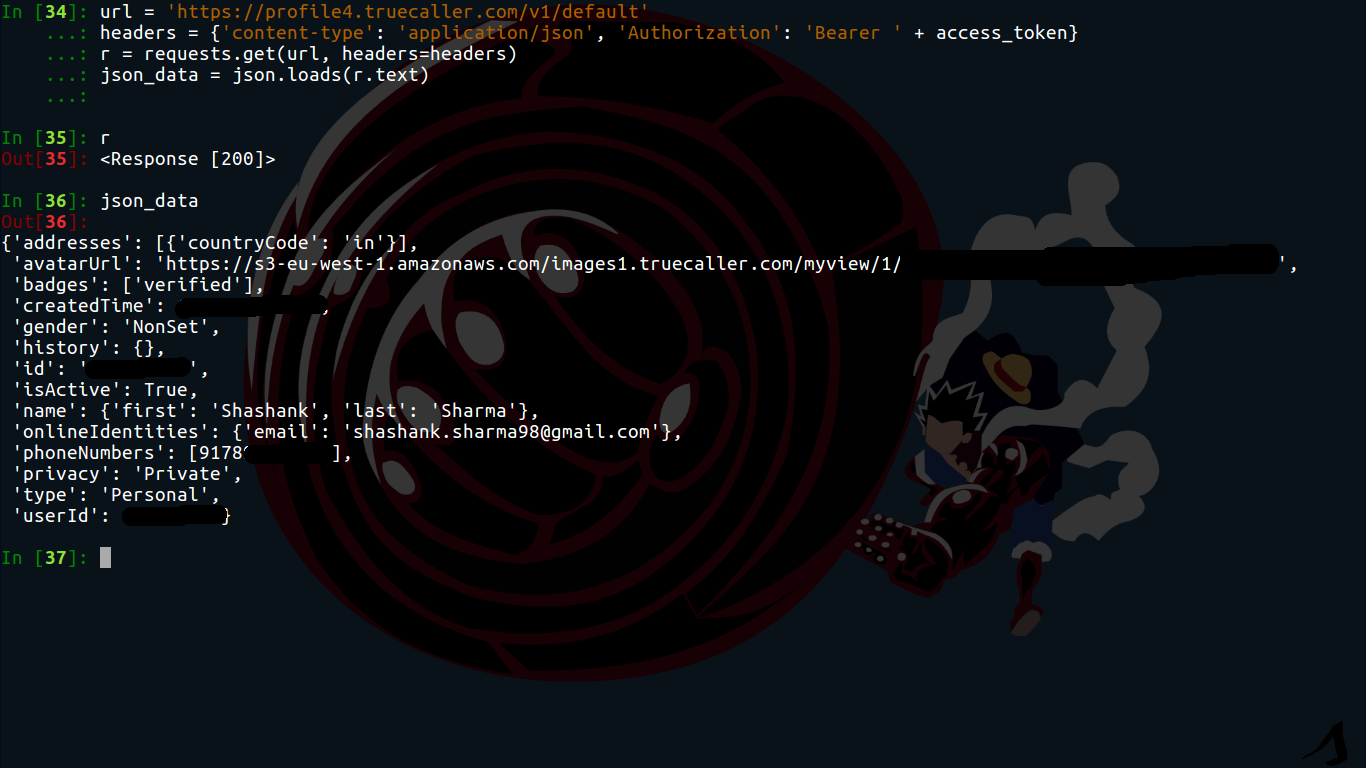
When we get accessToken then we can fetch all the details of that user and for this we make use of this url:
https://profile4.truecaller.com/v1/default
We need to make one GET request to this url with accessToken as header parameter (Look in Github repository for more info). At success you will receive all the details for that user in JSON format. So in views.py it will be written similar to ajaxpost function:
def get_name(access_token):
    url = 'https://profile4.truecaller.com/v1/default'
    headers = {'content-type': 'application/json', 'Authorization': 'Bearer ' + access_token}
    r = requests.get(url, headers=headers)
    json_data = json.loads(r.text)

    return json_data['name']['first'] + ' ' + json_data['name']['last']
In previous code I simply extracted the name from it, but you can fetch more data also like email, address, gender etc. So at final our views.py must look like this:
from .models import Truecaller
from django.views.decorators.csrf import csrf_exempt
from django.http import JsonResponse
import requests
import json
import urllib.parse

def get_name(access_token):
    url = 'https://profile4.truecaller.com/v1/default'
    headers = {'content-type': 'application/json', 'Authorization': 'Bearer ' + access_token}
    r = requests.get(url, headers=headers)
    json_data = json.loads(r.text)

    return json_data['name']['first'] + ' ' + json_data['name']['last']

def ajaxpost(request):
    phone_number = request.POST['phone_number']

    url = 'https://api4.truecaller.com/v1/apps/requests'
    headers = {'content-type': 'application/json', 'appKey': 'APP_KEY'}
    data = {'phoneNumber': phone_number}
    r = requests.post(url, headers=headers, data=json.dumps(data))
    json_data = json.loads(r.text)
    truecaller_model = Truecaller()
    truecaller_model.requestId = json_data['requestId']
    truecaller_model.phone_number = phone_number
    truecaller_model.save()
    return JsonResponse({
        'status_code': r.status_code,
        'text': r.text,
        'requestId': json_data['requestId']})

@csrf_exempt
def truecaller(request):
    if request.method == 'POST':
        try:
            json_data = json.loads(request.body.decode(encoding='UTF-8'))
            truecaller_model = Truecaller.objects.filter(requestId=json_data['requestId']).get()
            truecaller_model.access_token = json_data['accessToken']
            truecaller_model.save()
            return JsonResponse({'message': 'Success'})
        except:
            return JsonResponse({'message': 'Invalid request', 'status': 'FAILED'})
    else:
        try:
            requestId = urllib.parse.unquote(request.GET['requestId'])
            truecaller_model = Truecaller.objects.filter(requestId=requestId).get()
            if truecaller_model.access_token:
                return JsonResponse({'message': 'Success', 'status': 'OK', 'name': get_name(truecaller_model.access_token)})
            else:
                return JsonResponse({'message': 'Failed', 'status': 'NO'})
        except:
            return JsonResponse({'message': 'Invalid request', 'status': 'FAILED'})
Now our models is ready, views.py is done, so at last we will create our templates file which is important. Since we are doing AJAX call also so we will be writing javascript code also. We will be creating single page which is home.html. To avoid any CSS we will be using Materialize CSS Framework. So our html code will be pretty basic and you can have a look here, our main focus will be in writing the javascript code.
$(document).ready(function () {
    const form_data = $('.form_phone');        // Form with class form_phone
    form_data.submit(function () {
        $.ajax({
            url: '/ajaxpost',
            type: 'POST',
            data: form_data.serialize(),
            csrfmiddlewaretoken: '',
            success: function (data) {
                console.log(data);
                if (data['status_code'] === 200) {  // We got requestId
                    Materialize.toast('Please Check your phone for confirmation', 2000);
                    $('#status').html('Waiting for Confirmation');

                    // Check for access_token every 4 seconds
                    const access_token = setInterval(check_access_token.bind(null, data['requestId']), 4000);

                    function check_access_token(requestId) {
                        $.ajax({
                            type: "GET",
                            url: "/auth/true-sdk",
                            data: {
                                'requestId': requestId
                            },
                            success: function (response) {
                                console.log(response);
                                if (response['status'] === 'OK') {  // Name fetched successfully
                                    clearInterval(access_token);
                                    $('#status').html('Welcome ' + response['name']);
                                } else if (response['status'] === 'NO') {  // User has not authenticated yet
                                    console.log('Requesting');
                                } else {                            // Error caused: Terminate
                                    console.log('ERROR');
                                    clearInterval(access_token);
                                }
                            },
                            error: function () {
                                console.log('Error, Please refresh this page');
                                return false;
                            }
                        });
                    }
                    $(window).on("unload", function (e) {   // Stop the function call interval
                     clearInterval(access_token);
                  });
                } else {
                    Materialize.toast('Error: ' + data['text'], 3000);
                }
            },
            failure: function (data) {
                alert('Got an error dude');
            }
        });
        return false;
    });
});
This javascript code first checks if the form is submitted or not. If yes then it will make one AJAX call to ajaxpost and send phone number to our python function where it will generate requestId and send it back to javascript code. After getting requestId, it will make call to /auth/true-sdk/ every 4 seconds to check if access_token came or not.
Now our project is complete and it is working fine now. Here is the look:
To deploy it on Heroku we need to first initialize git to our local project and commit everything and at the same time we need to create more files.
First we need to create .gitignore so that we can ignore our virtualenv file and db files etc. So our .gitignore file will look like:
*.pyc
db.sqlite3
myvenv
__pycache__
local_settings.py
.env
*.swp
.idea
Now create runtime.txt to specify the python runtime in Heroku which will be: python-3.6.2 Then create requirements.txt and add these dependencies:
Django==2.0.2
psycopg2==2.7.3.1
dj-database-url==0.4.2
gunicorn==19.7.1
whitenoise==3.3.0
requests==2.9.1
For Heroku we will be using PostgreSQL that’s why we are using pyscopg2 and dj-database-url (make sure you install it in your local project directory). Now you need to add these settings in settings.py file at last:
STATICFILES_DIRS = (
 os.path.join(BASE_DIR, 'static'),
)

STATIC_ROOT = os.path.join(BASE_DIR, 'staticfiles')
DATABASES['default'] = dj_database_url.config()

SECURE_PROXY_SSL_HEADER = ('HTTP_X_FORWARDED_PROTO', 'https')

try:
from .local_settings import *
except ImportError:
    pass
And our local_settings.py will look like:
import os
BASE_DIR = os.path.dirname(os.path.dirname(__file__))

DATABASES = {
 'default': {
 'ENGINE': 'django.db.backends.sqlite3',
 'NAME': os.path.join(BASE_DIR, 'db.sqlite3'),
 }
}

DEBUG = True
This is because we want to test our project locally also that’s why we used local_settings.py. At the same time you can create one static folder in your root directory with js and images mentioned over there. When you will be deploying your code on Heroku you need to add static folder also. And at last we will edit Procfile:
web: gunicorn truelogin.wsgi
where truelogin is your django project name
and wsgi.py file as:
import os

from django.core.wsgi import get_wsgi_application
from whitenoise.django import DjangoWhiteNoise

os.environ.setdefault("DJANGO_SETTINGS_MODULE", "truelogin.settings")

application = get_wsgi_application()
application = DjangoWhiteNoise(application)
Now we are set to go. We have set up postgreSQL, whitenoise, and all necessary files which are required. In case if you have missed or not sure what really happened you can have a look at my Github repository: https://github.com/shashank-sharma/python-truecaller-sdk
In case if you want to set environment variables in Heroku then you can see this link, because if you will notice in my Github repository I have used os.environ[‘APP_KEY’] to avoid sharing my key to public. So I have added environment variables separately and I also recommend you to do that.
Now let’s commit everything and push it into our app on Heroku.
git commit -m "Initial Project"
heroku git:remote -a django-login
git push heroku master
In case of django-login you need to use your own app name which you defined earlier. After pushing these changes you should see no error on your Heroku CLI. With successful deployment you need to migrate your project over there by doing:
heroku run python manage.py migrate
Make sure you execute this code at that same directory where you linked your Heroku repository with your local project else you might need to mention app name by doing
heroku run python manage.py migrate --app django-login
And it will migrate easily.
Now your project is ready and you can use it into your own Django Web app to authenticate user with their phone number without using any OTP or SMTP service. Simply using TrueSDK you can do it with few lines of code.
In case of any bugs found here or I might have missed something please mail me or create issue at my github repository.